
 Pin
Pin
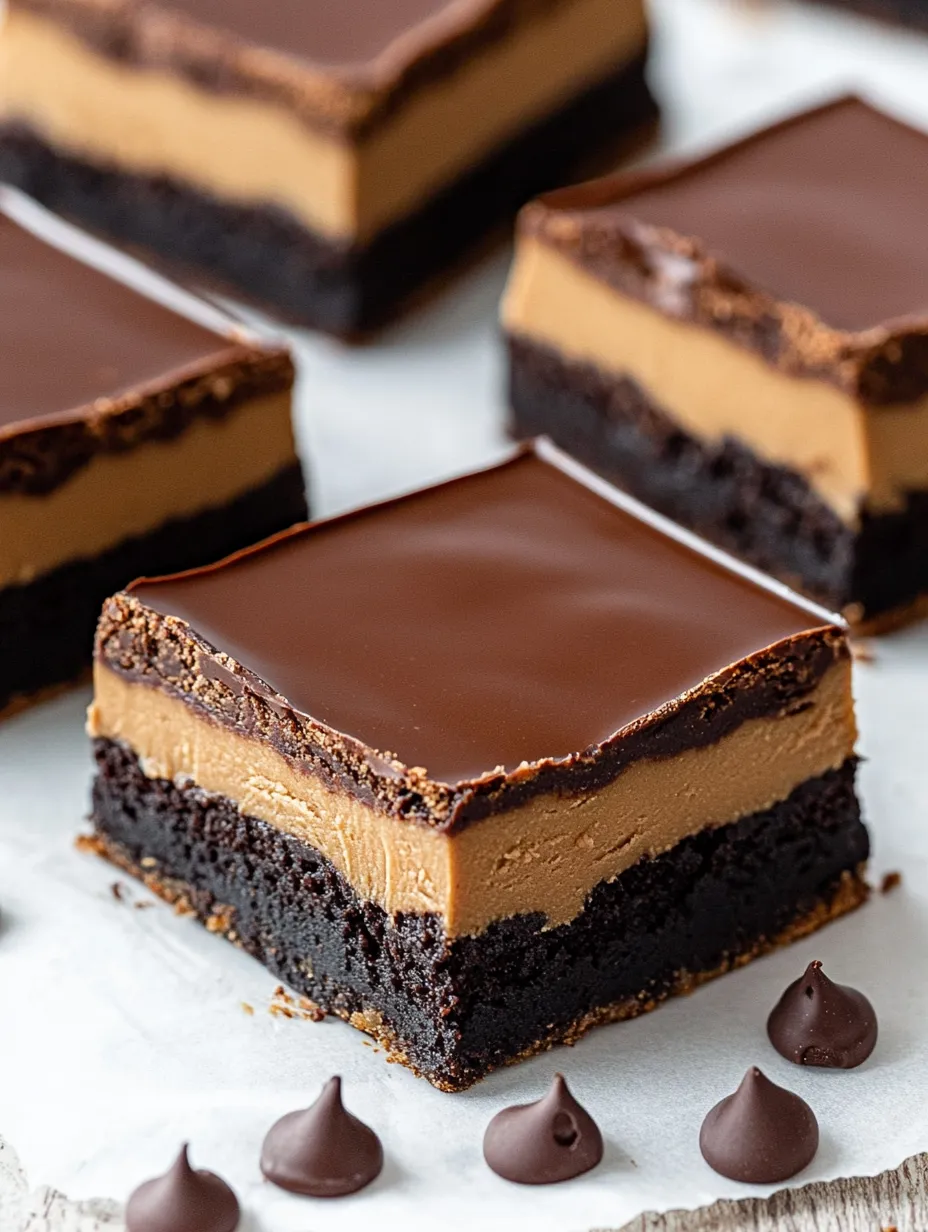
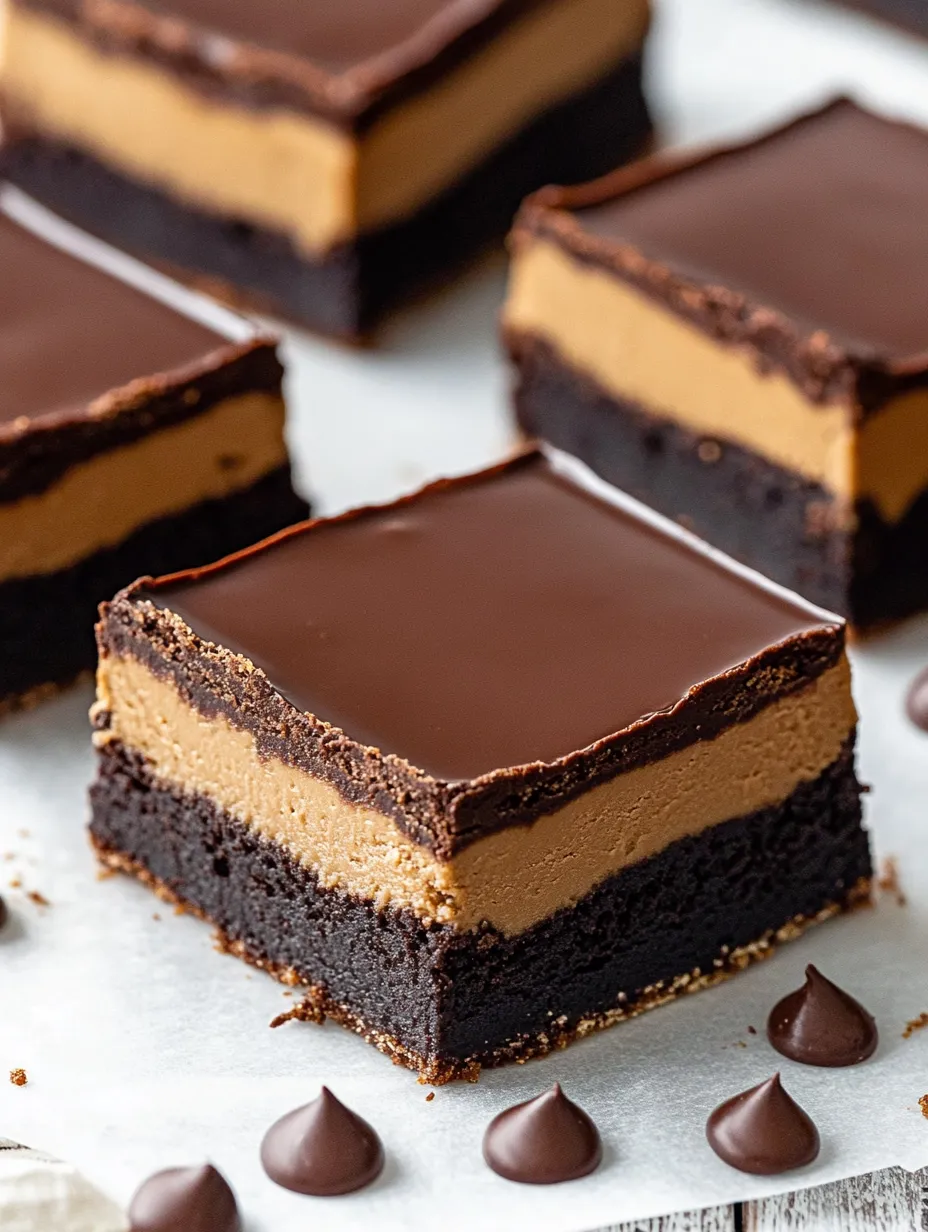
Get ready for a treat that turns Ohio's buckeye candies into thick, chocolatey bars. These brownies start with a soft chocolate layer, then stack on a sweet peanut butter center, and finish with a dreamy, shiny top. It's the kind of thing that'll have your friends sneaking back to the pan for just one more bite.
The first time I shared these at a cookie swap, folks couldn’t believe how fast they vanished. Now, my family won't let me show up without bringing a pan. I always double up, just for the bonus snacks at home.
Irresistible Ingredients
- Kosher salt: Rounds out all the flavors so nothing falls flat
- Baking powder: Lifts the batter a touch, so it's not too dense
- All-purpose flour: Keeps everything together but still soft
- Unsweetened cocoa powder: Delivers deep, real chocolate taste
- Pure vanilla extract: Brightens the brownie flavor
- Large eggs: Add both richness and help hold the bars together
- Granulated sugar: Takes the edge off bitter cocoa
- Semi-sweet chocolate chips: Brings gooey, chocolate bites without being super sugary
- Unsalted butter: Gives that buttery taste and moist texture
Peanut Butter Center
- Pure vanilla extract: Adds a little balance to the sweet middle
- Powdered sugar: Makes a creamy, thick filling—just like real buckeyes
- Creamy peanut butter: Classic base—brand names work best for a firm middle
- Melted unsalted butter: Helps stir everything until it's totally smooth
For the Ganache Layer
- Heavy whipping cream: Blends with the chocolate to stay glossy and rich
- Dark chocolate chips: Thick, delicious topping with a nice shine
Super-Easy Directions
- Finish and Chill:
- Spoon the ganache over the peanut butter, spreading right to the corners. Let the whole pan chill in the fridge until the top sets solid—count on it taking at least two hours. Slicing while cold gives you nice, sharp bars.
- Create Chocolate Ganache:
- Dump chocolate chips and cream into a bowl that can take some heat. Zap it in the microwave for a minute, then give it a stir until you don't see any lumps. It might look rough at first, but just keep stirring until it turns smooth and holds a shine.
- Apply Peanut Butter Layer:
- When the brownies are out and still a little warm, drop dollops of the peanut butter mixture across the pan. Gently spread it out, covering every bit—do it carefully so you don’t break the base.
- Prepare Peanut Butter Layer:
- While the first layer bakes, blend melted butter, peanut butter, vanilla, and powdered sugar together. Beat until completely smooth and thick, just like the inside of buckeye candies.
- Bake the Brownie Layer:
- Scrape batter into your parchment-lined pan. Bake for about 23-25 minutes. The middle should be a little fudgy—a skewer should come out with just a few moist crumbs.
- Mix in Dry Ingredients:
- Gently fold in the cocoa powder, flour, salt, and baking powder. Stop mixing the second you don't see any dry bits, so your brownies stay tender and soft.
- Add the Wet Ingredients:
- Add eggs one at a time, stirring in between. Toss in the vanilla and stir again. You want everything totally blended for fudgy bars.
- Create the Brownie Base:
- Melt butter in a pan over low heat. Turn off the burner, then stir in chocolate chips and sugar until you've got a shiny, smooth mix.
- Prepare the Pan:
- Get your oven hot—350°F—and line your baking dish with parchment. Leave some paper hanging out so you can lift the brownies later. Skipping this step makes removal and cleanup a hassle.
 Pin
Pin
The peanut butter part is the real star. I once gave fancy 'natural' peanut butter a shot, but the middle never firmed up and just stayed mushy. If you want bars with their classic, fudge-like bite, Jif or Skippy is the way to go. Trust me—don’t mess with the classics here.
Storing Made Simple
Keep these bars chilled and tightly covered in the fridge. They'll taste awesome for about five days. For longer stashing, cut and freeze the bars. They'll hold up for three months. Just move them to the fridge overnight before you plan to serve ‘em.
Change It Up
Make these your own! Swap in crunchy peanut butter if you like a bit of crunch. Sprinkle sea salt on top of the chocolate for sweet and salty in every bite. Want a bigger chocolate punch? Try dark cocoa powder or stir espresso powder into the batter (it boosts chocolate—but you won't taste coffee). Play around!
How to Serve
These bars don’t really need anything extra, but go ahead—bring out the vanilla ice cream or a glass of milk for a classic combo. Fancy it up for a party: dust your plate with cocoa, add a square, top with whipped cream and a raspberry. Looks like it came out of a dessert café.
 Pin
Pin
Ohio Fun Fact
Buckeye candies look like Ohio's state tree nut, which peeks out from its shell with a brown top and tan bottom. Classic buckeyes are peanut butter balls half-dipped in chocolate, leaving a bit of peanut butter showing. These brownies deliver that taste—with less fuss and way more chocolate in every bite. No wonder they're a staple all across the Buckeye State—and beyond.
FAQs About the Recipe
- → Can I use natural peanut butter for the filling?
Natural peanut butter likes to separate, so the filling might turn oily or gritty. Regular creamy peanut butter works much better for this.
- → How do I store Buckeye Brownies?
Keep these bars in a sealed container in the fridge for about 5 days. If you want them to last longer, toss them in the freezer for up to 3 months.
- → Can the ganache be made without heavy cream?
You sure can! Swap the heavy cream for milk or half-and-half if you like. The ganache might not be as thick, but it’ll still taste great.
- → Do I need to chill the brownies before cutting?
Definitely! Cooling in the fridge helps the layers firm up. That way, you’ll slice perfect bars without a mess.
- → Can I use milk chocolate for the ganache?
Go ahead and use milk chocolate if you want a sweeter topping. Just keep in mind it’ll change up the flavor a bit.